Exterior Painting
STAGE 1
Set-up
Priming, painting, and staining are all surface applications to help beautify your home. It will be important for our estimator to look at your home’s exterior condition. Damage from dry-rot, woodpeckers, insects, and the environment will be noted along with recommendations of some siding boards being replaced. Noted articles, such as vines and shrubbery up against a surface to be stained or painted will be noted in the estimate. When a homeowner accepts our proposal, it is the responsibility of the homeowner to have anything growing up against the house such as vines and shrubbery taken care of.
Set-up is the first step our painters take in organizing the job site when they arrive. Our painters may remove shutters and downspouts, hanging planter chains, etc. Patio furniture and landscape decoration are moved away from the work areas.
We protect surfaces and items such as windowpanes and security lights with paper, plastic film, and tape. We pull shrubs back from the house. Drop cloths are laid down to protect pavers, decking, concrete flat-work, and landscaping.

STAGE 2
Thorough Preparation
For paint and stains to stick and achieve uniform coverage, all surfaces must be dry, dull, and clean!
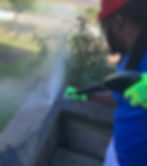
Depending on the surface we are beautifying, we may use a verity of tools such as wire-brushes and sanders, dusters, scrapers, and vacuums. We knock off cobwebs and dust off debris. If we are painting the gutters, we use this time to thoroughly hand wash and rinse the outside areas of the eavestrough.
Areas with failed paint are sanded or scraped. Small holes in the siding are filled and sanded. Small cracks are caulked. Bare wood is spot primed. Only after the primer is thoroughly dry, will we begin painting.
STAGE 3
Weather Permitting, We Begin Painting
Again, for stain and paint to stick, a surface must be dull, dry, and clean!
Wood that are painters have primed is back-brushed then painted. It is during this stage homeowners begin to see a transformation.
As we move around the outside of your home, we keep your lawn, decks, driveway, and landscaping tidy and organized.

STAGE 4
We Put Things Back Together
This step is often referred to as 'teardown'. Downspouts and shutters are reattached. Lawn ornaments and deck furniture are returned and touchups are completed. At the end of the job, we release shrubs that were pulled back from the house. We take up the drop cloths and dispose of all the plastic film barriers and coverings. We pick up any flakes and crumbs and return ladders to our work vehicles and trailer.
We do a final walk-around to make sure we are not leaving any tools behind and guarantee the homeowner is 100% satisfied with the work!

STAGE 5
Inspection Approval
Our lead painter will do a final inspection just prior to inviting the homeowner for a tour of the completed project. Here, every painter that was part of the job inspects their work making a final tidy up as they go.

STAGE 6
Business
We never request money down when you order our service; we don’t consider it good business to hold you and your money hostage!
Your painting crew is never assigned to two job sites at the same time.
Only when we arrive to begin work, may we require a deposit. Only when the work is complete, are we paid in full!


Attached Garages Bays
One of the most commonly used entry points into a home is through the attached garage. It is for this reason our customers have us paint the interior of their garage!
Although the walls are on the inside, we apply a high quality exterior paint to the walls and ceiling to achieve a bright fresh look. Dust is something that clings to dull surfaces, so we paint the walls and ceilings in a satin finish.
Before we get started on painting, items in the garage are moved to the center of the room and covered with plastic, while other items are temporarily stored outside. We cover every square inch of the floor with drop cloths and remove electrical covers just like when we are painting a home’s interior. After inspection the drop cloths are taken up and electrical plates put back.
BEFORE
AFTER
BEFORE
AFTER


Attached Garages Bays
One of the most commonly used entry points into a home is through the attached garage. It is for this reason our customers have us paint the interior of their garage!
Although the walls are on the inside, we apply a high quality exterior paint to the walls and ceiling to achieve a bright fresh look. Dust is something that clings to dull surfaces, so we paint the walls and ceilings in a satin finish.
Before we get started on painting, items in the garage are moved to the center of the room and covered with plastic, while other items are temporarily stored outside. We cover every square inch of the floor with drop cloths and remove electrical covers just like when we are painting a home’s interior. After inspection the drop cloths are taken up and electrical plates put back.
BEFORE
AFTER


Overhead Garage Doors
Overhead garage doors are made from a variety of materials. A fresh coat of paint that ties in your trim can really go along way with your home’s curb appeal.
If your garage door is in excellent condition we can paint it. We are able to paint aluminum doors so they will never scale or flake.
Before we can begin, we cover any objects inside the garage that the homeowner does not want paint-dust to fall on. Vehicles, lawn tractors, and bicycles are removed and parked at a reasonable distance from the work area.
We remove the side and overhead weatherstrip from the garage frame. Next, we wash and rinse the door by hand and allow to dry. Next, we tape off the rubber bumper. We shield the flashing that covers the frame of the garage door, and we tape off the exterior garage door handle and plate. Next, we lay down drop cloths on the driveway. Finally, we spray multiple coats of paint to your garage door.
Upon inspection of the door, the drop cloths are taken up. Next, the paper and plastic barriers are torn down and the weatherstrip is reattached.
BEFORE
AFTER


Wood Pergolas
Michigan’s weather is harsh on exterior wood structures. For this reason, we do not wash wood under high pressure!
Grills, lawn, and patio furniture are removed from the worksite. Hanging planters and chains are taken down. Spiderwebs are swept away and grime is washed off of the pergola. Next, the structure is scraped and old loose paint is knocked off and disposed of. Next, drop cloths are laid down to protect pavers, decking, concrete flat-work, and landscaping from stray paint. All bare wood is spot-primed. Next, we prime the entire structure. Finally, we apply two coats of high quality exterior paint to the pergola.
After the work has been inspected, we tear down the site and put everything back to where it was.
BEFORE
AFTER

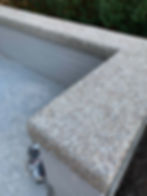
Brick Patios
Before we begin painting a brick patio, we wash the surface of the grouted mortar and brick to insure adhesion of the paint. We remove spiderwebs and we wire-brush for loose paint. We then allow the surface to thoroughly dry.
For paint to adhere, all surfaces to be painted, must be: clean, dull, and dry!
Cracks are filled with an exterior paintable caulk. Next, we pull back shrubs from the area that will be painted and we cover areas that are not to be painted with plastic and paper. Drop cloths are laid down over pavers, landscaping, and concrete flat-work such as concrete steps, and decking.
Finally, the painting can begin. If the brick has never been painted in the past, we back-roll to make sure the paint gets into every nook and cranny. Depending on the outside temperature, we use high quality paint suitable to the day’s temperature and humidity.
After we apply the paint, we teardown the plastic and return things to where they were.
Exterior Painting Services
-
Garage Bays
-
Pergolas
-
Brick Patio Walls
-
Chimney Stacks
-
Decorative Pediments, Crowns, and Columns
-
Garage Overhead Doors
-
Deck Staining/Painting
-
Entry Doors and Garage Access / Utility Doors
-
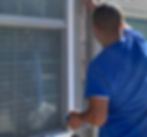
Window Frames and Sashes


Decorative Pediments, Crowns, and Columns
Michigan weather is harsh on exterior wood structures. For this reason, we do not wash wood under high pressure!
Spiderwebs are swept away and grime is washed off of the decorative surface. Next, the surface is scraped and old loose paint is knocked off and disposed of. Next, drop cloths are laid down to protect pavers, decking, concrete flat-work, and landscaping from stray paint. All bare wood is spot-primed with oil. Next, we prime the decorative surface. Finally, we apply two coats of high quality exterior paint to the façade’s pediment, columns, and crown.
After the work has been inspected, we take up the drop cloths and return planters and exterior entry mats, ensuring old paint flakes are not left behind.